We carry a wide selection of quality linear LED Neon Flex products and supplies for any lighting project. Connect Neon LED Flex Manufacturer http://www.ledvv.com/products/neon-led-strip/
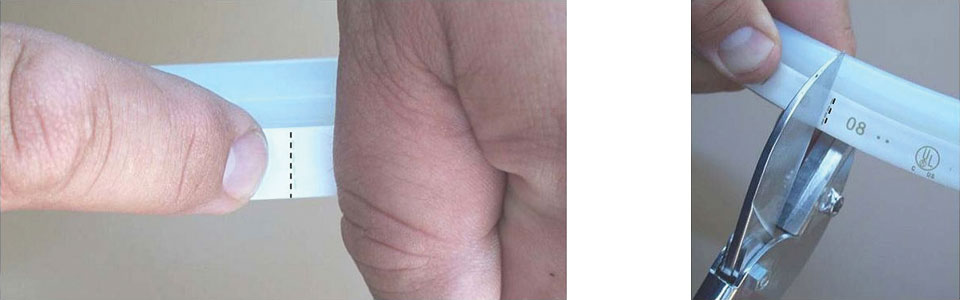
Cut LED Neon Flex
Locate the cutting mark on the side of the LED Neon Flex. This will be designated by a vertical dashed line. Using heavy-duty sheers or a utility knife, make an even cut through the LED Neon Flex exactly on the mark. If you are off the mark the product can be damaged.
It is imperative to use a very sharp cutting blade to make a straight cut. A sharp blade will help you avoid pulling the internal wires of the LED Neon Flex while making the cut. Stretching or pulling the wire may result in damaged or inoperable LED Neon Flex.
Connect the Power Pin
Position the LED Neon Flex so that as you look at the cut end the two exposed wires are located on your right hand side. (On Polar Neon V1, the wires are located on the bottom.) Using flat nosed pliers, position the power pin within the jaws of the pliers so that the sharp, barbed ends of the pin are facing outward.

Position the male power pin so that the ends of the pin line up with the centers of the two exposed wires on the cut face of the LED Neon Flex.
Holding the LED Neon Flex in one hand and the pliers in the other, push the power pin into the exposed wires of the LED Neon Flex with a steady amount of pressure until the clear plastic clip in the middle of the power pin meets the LED Neon Flex cut end.
Connect the Power Cord, Connectors and Jumpers
Using a heat gun, slightly warm the molded female power connector until the plastic end is just slightly malleable. Then position the power cord over the end of the LED Neon Flex and align the rounded ends of the male power pin with the female pin openings in the power cord. Now push the pins into the power cord until a snug/tight fit is attained. If you wish to have a more weather tight seal, apply a continuous bead of silicone sealant around the perimeter of the LED Neon Flex prior to pushing it into the power cord assembly.
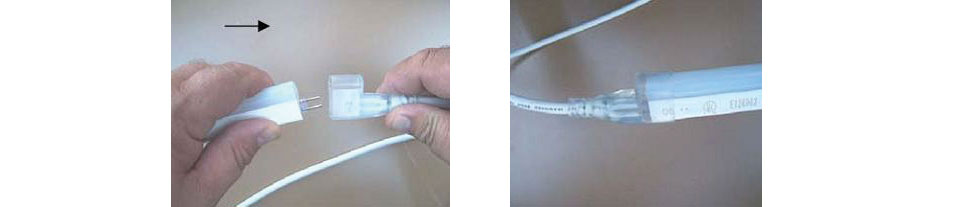
Using the same processes described above to attach connectors and/or jumpers to the opposite end of the LED Neon Flex as required for your project. Once you have completed your run, terminate the LED Neon Flex by sliding an end cap over the final exposed cut end.

Heat Shrink Tube Placement
Placing heat shrink tubing can provide additional weatherproofing at LED Neon Flex joint connections. Slide a piece of heat shrink tube over each connection point. Place the tubing evenly over the join area to be covered on the power cord. On all other connectors (end cap, X, T, L, Inside Corner, Outside Corner etc.) place the shrink tube so that it extends past the end approximately 1/8th of an inch. Once you have positioned the heat shrink tubing where needed, use a heat gun to shrink the tubing to wrap around the LED Flex Neon connection points.
